Building a mock server using Swift's Vapor
 Image by Schäferle from Pixabay
Javascript community has always been seen as the general purpose language: scripting, frontend, backend and even databases. Swift is slowly but surely gaining a place on that club as well with the spread adoption for server development frameworks. We’re about to go step by step into building our own mock server!
“Why should I bother with a mock Mauri?” you might be asking and I’ll reply with an all too familiar use case: you’re developing a feature on your app and, as faith would have it, your backend developer of trust has fallen behind of schedule. There are a few ways this could unentangle:
- You hardcode “probably” data structures within your codebase in order to mock your feature alternative flows. Bad idea
- You and your fellow backend dev defined a contract and you decide to inject JSON objects (to name a popular data format) instead. Not bad but still will require touching several places when the time comes to replace it for the real APIs.
- You pump it a notch and decide to go for a mock server so all your data will be serve as It would from a real API. This way all you’ll have to do later is replacing an endpoint 👏🏽
How do we proceed here?
There are a few players involve in server-side Swift development, such as Kitura and Amazon’s Smoke Framework but since the first one has been losing traction since late 2019 (IBM has reported they were stepping down as an active contributors) and Smoke is own by Amazon, I decided taking the open source choice: Vapor
The only prerequisites needed to start developing are having installed both Xcode and brew’s package manager, so pause reading here until you have both of them properly setup.
All you need to do to kick start this is simply typing in your terminal
$ brew install vaporAfter it finishes, double check everything is fine by executing this command
$ vapor --helpIf everything went well, you should see a list of available commands. Otherwise head to the resources section to dig in until you find your specific scenario.
Bootstrapping our mock server
Setting up our project is extremely simple, all is needed is typing the following command into the terminal (type pwd to check you’re positioned on the desired directory to proceed)
$ vapor new name-of-the-project -n(Feel free to replace name-of-the-project by any name of your choice.)
The -n flag answers no automatically to all questions the Toolbox would ask you otherwise. Since we’re setting up a vanilla mock server, we don’t need any fancy tool for the time being.
Enter the new autogenerated project by typing
$ cd name-of-the-projectLaunch the project in Xcode
$ open Package.swiftThe project will start downloading all Swift Package Manager dependencies once it’s opened. Go ahead and run it after it finishes, as a target select “My Mac”. You should see this on Xcode’s terminal
[ INFO ] Server starting on http://127.0.0.1:8080
Go to your browser of choice and visit that address. “It works!” should be displayed now and with that I say: congrats for deploying your first Swift server 🥳
Doing something useful with your endpoints
“Ok Mauri, big deal: I have a local server printing a hardcoded message”
Let’s put this server to proper use, shall we? In the project structure, head over routes.swift file. Here you’ll find a single method that receives an Application object, alongside a couple of hardcoded responses (we already saw one of them in our test run above) within closures.
Let’s say for instance you need an endpoint to return a JSON response with some data (maybe even have some of it dynamically injected from the URL itself). In order to implement this we’ll need to add another case to the routes method mentioned above, as well as the data structure representing our JSON in question.
import Vapor

struct User: Content {
    let id: Int
    let name: String
    let avatar: String
    let twitterHandler: String

    init(id: Int) {
        self.id = id
        name = "Mauricio Chirino"
        avatar = "https://geekingwithmauri.com/assets/resources/profile.png"
        twitterHandler = "chirino89"
    }
}
(I specified the init constructor to receive only the id for speeding up the example.)
Content protocol conforms behind scenes to Codable, RequestDecodable and ResponseEncodable. This compliance is necessary in order to make our struct above a valid response from our endpoint down below.
// Dummy response
app.get("dummyUser") { request -> User in
    let mockUser = User(id: 123456)
    return mockUser
}
Run again your project and visit http://127.0.0.1:8080/dummyUser to find our JSON object being returned as we expected 😬
Hold on, you mentioned something about injecting values into our mock response
What if you want to have one of its value read from the URL? We can turn our endpoint into a dynamic one leveraging the routes parameter that Vapor allows
// Experimenting with parseable input on request's path
app.get("user", ":numericValue") { request -> User in
    let userId = request.parameters.get("numericValue", as: Int.self)!
    let mockUser = User(id: userId)

    return mockUser
}
app.get is a function that handles variadic parameters which is fancy way to say it can receive as many parameters as desired, in compliance with coma-separated format of course. Any of said parameters that are prefixed with a colon (:) will be a dynamic one. Above we accessed and casted it via the grabber function .get
{
	"id": 64055988,
	"twitterHandler": "chirino89",
	"name": "Mauricio Chirino",
	"avatar": "https:\/\/geekingwithmauri.com\/assets\/resources\/profile.png"
}
(JSON encoding is used by default but this is easily configurable should it be necessary.)
What if you want to check for proper error handling should it be the case? Fair enough, let’s tweak our endpoint to be a little more robust. Above we forced unwrapped the casting from the dynamic route (String) into a numeric value (Int) which is risky. Down below there’s a safer way to handle this.
// Handling input errors
app.get("user", ":numericValue") { request -> User in
    guard let userId = request.parameters.get("numericValue", as: Int.self) else {
        throw Abort(.badRequest)
    }

    let mockUser = User(id: userId)
    return mockUser
}
For a complete list of supported HTTP errors, check out the docs
Conclusion
While your unit tests should be completely isolated from external input, you’ll usually find yourself in scenarios where end to end testing is demanded in order to validate entire flows and you won’t want to sit around, waiting for BE to finish their part for you to double check yours.
In times like these, this approach is useful. Use it carefully: you don’t want to be redoing locally another’s team work just for testing purposes.
Final considerations
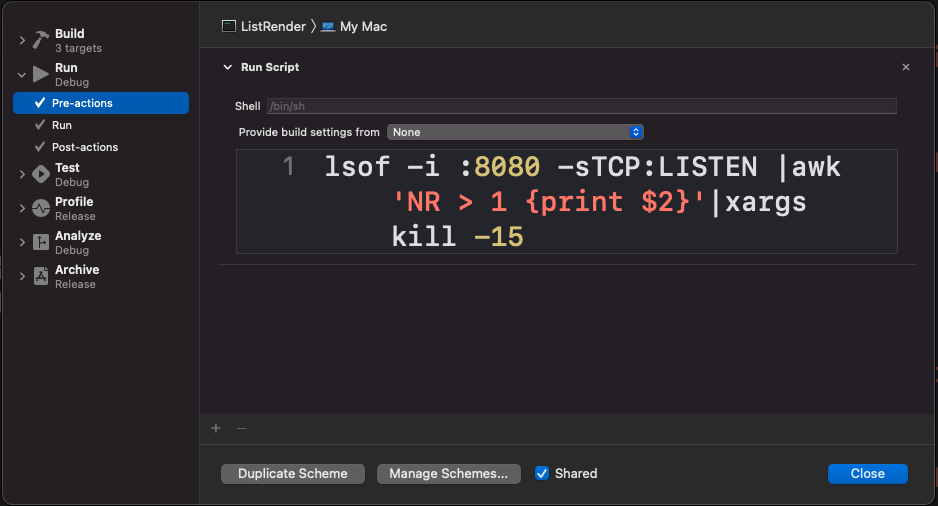
Free your ports on every deploy
If you ever run into the the “address already used” message in the console then it means the port your deploying to is blocked -already in use-. It’s recommended to kill every process on each run. This can be automatically achieved by adding the following command to the pre/post action run scheme’s setup:
lsof -i :8080 -sTCP:LISTEN |awk 'NR > 1 {print $2}'|xargs kill -15
Edit scheme… -> Unfold Run and add the command above to both Pre and Post actions.
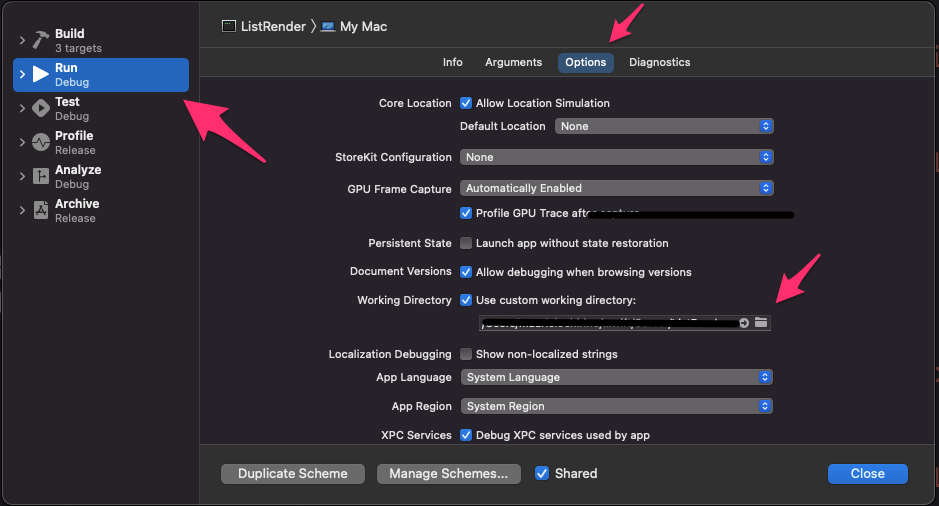
Setup your working directory in Xcode after project’s generation
It’ll happen to you eventually: as you start tweaking your server, you start fighting non sensical bugs such as Xcode trying to go fetch your assets in the DerivedData folder 🤦🏽♂️
In order to fix this, same drill as before: Edit scheme… -> Run -> Options and look for your current project directory in the Use custom working directory: option
I highly recommend this article in order to avoid some of the most common mistakes you’ll face whenever you’re starting with Vapor. Cheers!