Documentation in practice for Swift
“Without Knowledge, action is useless and knowledge without action is futile.” ― Abu Bakr
If you ended up in this post, chances are you know you should document your code and currently aren’t doing it. Well, let me tell you it’s not enough to document it, this information MUST be easily accesible by anyone who wants to use it. But on the bright side, the fact that you’re here instead of procrastinating in Twitter shows progress on your behalf. Good for you 👏🏽
On the other hand, if you’re still uncertain about documenting regularly (you might even think you write code so well it documents itself), then please bare with me while I make my case. This post will be broken down into sections so feel free to skip ahead into a specific one, depending on your needs.
- Why documenting matters
- What is good documentation?
- How to do it effectively
- Using jazzy for the job
- Use case in practice
- Make it findable
- Final thoughts
With no further do, let’s dive in! 🤿
Why documenting matters
The ratio of time spent reading versus writing is well over 10 to 1. We are constantly reading old code as part of the effort to write new code. - Robert C. Martin, Clean Code
If nothing else, do your future self a favor. As stated above, chances are you’re going to spend an awful lot of time reading through your code base; you might as well make it easier to read over time by adding documentation. Writing what a piece of code is supposed to do forces you to reason about it in an organized manner, hence I’d argue documenting also improves the potential testability of it.
Look at it this way: any serious piece of software you write should ideally be thought as a possible building block for something bigger tomorrow. There’s not too much point in creating an elegant, reusable solution if every time anyone (including you) wants to use it has to dig deep in source code to grasp its inner workings. This gap is easily filled with great documentation.
Think in all the code we write on daily basis, including all third party dependencies we use: from a UICollectionView to Snapshot testing… How likely would we be to have them as our mental shortcuts for the domain they solve, let alone use them at all, if not for the great documentation there’s behind these kind of frameworks and libraries?
Finally, documenting is a great way to get involve in any open source project. And this in and of itself has many great benefits.
What is good documentation?
In order to write effective documentation, the former must fulfill three principles:
- *It must answer what a piece of code does, not necessary how (at least not in depth): If you’re going to use a
sortingmethod you might not need to know (or even care for that matter) what type of algorithm is used for that task. Sure, we can mention it uses Quicksort but going into details how it works is an overkill. - Easy to find: you can be the William Shakespeare of documentation but if nobody can read it when they need it, well then it’s as good as nothing. Good documentation must be findable outside your IDE of choice.
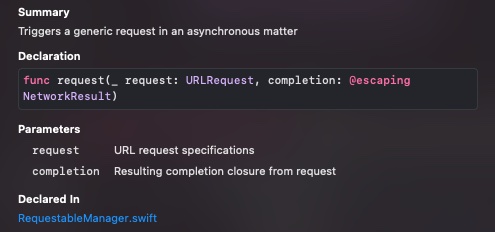
- Show, don’t tell: this is one of those golden rules of writing. Don’t limit your documentation to a bunch of technical jargon. Show examples of usage and, when possible, where to use them.
 |
 |
| Show | Don’t tell |
Document only what’s going to be used by the outside world. It’s a myth that every single line of code should be documented. There are better uses for your time so invest it where it counts (see the 3 points above when in doubt).
How to do it effectively
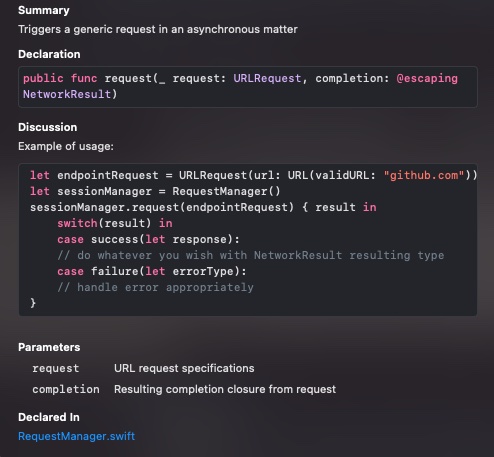
Writing documentation in Swift is great because it has markup support embedded so documentating is easier than ever nowadays. Xcode even provide us the appropriate template when we set the cursor on the name of our protocols/classes/structs and hit ⌘ + ⌥ + /. The example shown above was generating using this syntax:
/// Triggers a generic request in an asynchronous matter
///
/// Example of usage:
///
///      let endpointRequest = URLRequest(url: URL(validURL: "github.com"))
///      let sessionManager = RequestManager()
///      sessionManager.request(endpointRequest) { result in
///          switch(result) in
///          case success(let response):
///          // do whatever you wish with NetworkResult resulting type
///          case failure(let errorType):
///          // handle error appropriately
///      }
///
/// - Parameters:
///   - request: URL request specifications
///   - completion: Resulting completion closure from request
When ⌥ + click on top of any code that’s documented, rendering ocurrs and it’s shown in that pretty format. Since going into deep in markup formatting is beyone the scope of this post, I urge you to check for more details in the official documentation (no pun intended 🥁)
Using jazzy for the job
We already established above that documentation must be findable beyond your IDE. In other words, anyone in need for any of your APIs shouldn’t have to go through the source code of them necessarily in order to consume them properly. So how do we achieve this? One way is using a great tool built specifically for this task: Jazzy.
Jazzy is a command-line utility maintained by the folks of realm that generates documentation for Swift and Objective-C, directly from both source code and compiled modules. It dumps all that generated docs into a well formatted static site that resembles Apple’s official documentation styling.
Prerequisites
The following is a list of optional (but highly recommendable) things you should have installed in your system before proceeding
- Brew: this is a great package manager for macOS. It will ease many of the installations you’ll have to deal with in your environment setup, not only for jazzy and its requirements, but in general.
$ /bin/bash -c "$(curl -fsSL https://raw.githubusercontent.com/Homebrew/install/HEAD/install.sh)"- rbenv or RVM: As a prerequisite for installing this gem (Jazzy), I recommend installing a Ruby version manager first. This is so you don’t run into common permission conflicts that otherwise arise when using OS X vanilla ruby version directly from the terminal (it usually starts failing due to lack of permissions and all sort of stuff).
After doing some digging into which version manager to use, I decided to pick the first one essentially because I found it to be less invasive (RVM overrides shell commands and I have trust issues with that sort of politics).
Installing it via Brew is as simple as:
$ brew install rbenvWe then setup rbenv in our terminal by simply typing:
$ rbenv initAs a side note, the terminal your using will print a recommendation command for you whe it’s finished. Such command should be added into your bash profile in order to execute the step above automatically from now on. In my case I use Oh My Zsh so I added the line below at the bottom of my .zsh file.
eval "$(rbenv init -)"
We check everything is working properly by running the rbenv-doctor script like so:
$ curl -fsSL https://raw.githubusercontent.com/rbenv/rbenv-installer/main/bin/rbenv-doctor | bashYou should see everything working properly and telling you that there aren’t any ruby versions installed yet in rbenv path.
Go ahead and declare the desired ruby version to install in your project’s root path within a .ruby-version text file. At the time of this writing, *the latest stable version was 3.0.1 so that’s the one we’ll install.
rbenv install 3.0.1- Bundler: I knew bundler through a colleague of mine at work. All it does is centralizing all your Ruby gems and their respective versions for your project.
$ gem install bundlerIn case your terminal rejects the above command due to a lack of writing permissions, check your Gems environment by executing:
$ gem env homeIf above output is pointing to your system default Ruby version, it shouldn’t. That’s the entire reason we took all the trouble in setting up rbenv in the first place, but things sometimes go wrong. What solved this for me was rehashing rbenv like so:
$ rbenv rehashNow you should see some form of your user path from the output of the command below:
$ gem env home
# => ~[your_username]/.rbenv/versions/<ruby-version>/lib/ruby/gems/...
We define our Gemfile with our desired gems in it:
source "https://rubygems.org"

gem "jazzy"
And install it via Bundler:
$ bundler installSetup
Setting up Jazzy is dirt simple:
$ gem install jazzyIn case you want to avoid messing directly with sudo permissions in order to modify your system files –which I recommend against if you’re not COMPLETELY sure what you’re doing–, I’d suggest following the above steps detailed in the prerequisites section.
The command jazzy should now be available in your terminal. All that’s left now is executing it with the proper set of flags configured for our case.
Use case in practice
I followed the steps above in order to generate the documentation you see for MauriNet. This is a Networking wrapper I built using the Swift Package Manager (SPM) around Swift’s native URLSession so it wouldn’t be necessary to add third party dependencies for simple GET/POST requests and skipping the boilerplate ceremony each time I’d have to use it. Feel free to check it out. Feedback is not only welcome but encouraged, I’ll be delighted to receive pull requests in this and any of my other repos.
As a disclaimer, my library doesn’t have a .xcworkspace (it’s not a pod) nor a .xcodeproj commonly generated by Xcode for projects. That’s why I can simply execute in my terminal the following command without further arguments and have a successful response from it:
swift test -vFor the other cases I stated above (cocoapods, custom projects with .xcodeproj) you must find the appropiate command that builds them via terminal in order to have jazzy generate docs for them.
The entire command executed for jazzy to generate the docs looks like this:
$ jazzy \
--clean \
--author "Mauricio Chirino" \
--author_url https://geekingwithmauri.com \
--github_url https://github.com/GeekingwithMauri/MauriNet \
--output docs \
--disable-search \
--skip-undocumented
Since the line would have been too long to fit in a single snapshot, I specified new lines between each of the flags using \ for the sake of explaining. Let’s see what each of them means:
clean:delete any previous output before generating a new one.author:who’s behind this documentation.author_url:where can this person (or company) be found.github_url:project’s Github repo.output:folder where the entire output will be dumped.disable-search:this skips generating a search bar for the site. I found it confusing to use since the results were plain json instead of HTML page.skip-undocumented:avoids generating doc for undocumented code. Really useful to hide work in progress within your modules/frameworks.
Make it findable
I know you probably thought after clicking on the the documentation generated above “well hold on a secong Mauri, you said documentation must be easy to find. This is a not very friendly to read on!” and… You’d be partially right. Why do I say “partially”? If you download the project and head over the /docs folder, just by clicking on index.html you’ll be prompted into your browser and see an entirely functional documentation.
But since I’m kind of contradicting myself with all the extra steps above, let’s make this click-prof findable by setting /docs folder as a Github page:
- After your documentation is pushed in your repository (ideally in its root), head over to its Github ⚙ Settings
- Select Pages on the left bar, near the bottom of the list.
- In the source list, select the branch where the documentation was pushed and next to it, the folder (
/docsin our case unless) This is a requirement since Github only allows for a directory with either this same name or the repo’s root folder. - After clicking Save, you should see the resulting link where the documentation is hosted now. Give a minute or two until Github deploys it.

To check the state of the deployment, head over to:
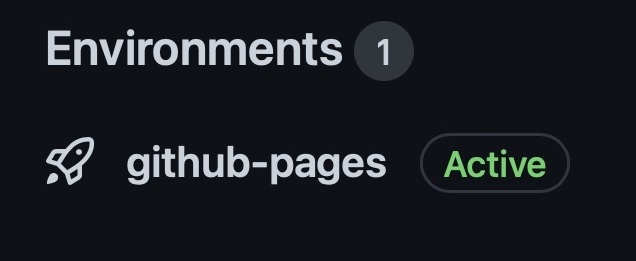
https://github.com/[your_github_user]/[you_repo]/deployments/activity_log?environment=github-pagesThe shortcut for this is the link next to the little rocket on the right side within your repo’s main page

Now this is findable documentation for MauriNet 🔎📜
Final thoughts
As all things in life, the beauty of habit relies on consistency: start small if you’ve never done it before. Pick any function or class that you’re constantly working with and demands you to go through it every single time. That’s a great example of code that needs documentation -and potentially testing, but that’s a subject of another post-.
Trust me when I say to you your future self will be appretiate the effort as well as your productivity, overall levels of strees and teammates.
 Image by